Cooking Timer: Times, Temps and Timing
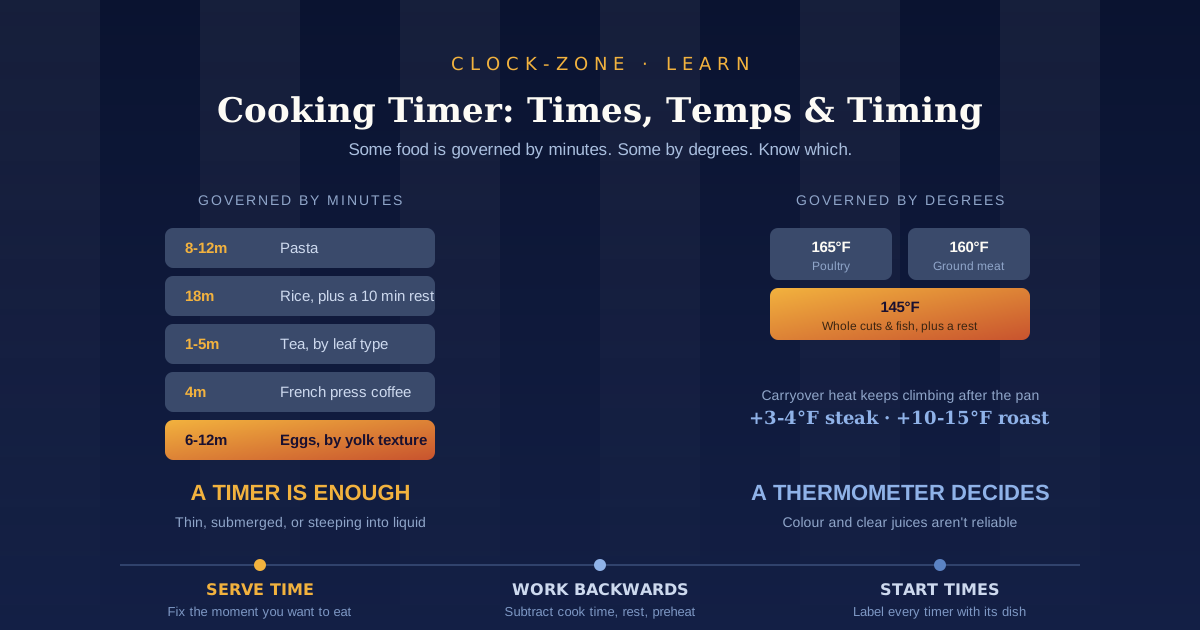
TL;DR: A cooking timer measures duration, which is exactly right for pasta, rice, tea and coffee. It's the wrong tool for meat, where doneness depends on internal temperature rather than minutes elapsed. And when several dishes share one deadline, no timer helps unless you've worked backwards from the moment you want to eat.
Setting a timer is the easy part. The hard part is that the number you're setting it to was measured in someone else's kitchen, on their hob, in their pan, at their altitude, with their idea of what "medium heat" means.
That's why the same recipe can produce perfect rice for the person who wrote it and a scorched pot for you. It isn't your cooking. It's that a printed time is a starting point dressed up as an instruction.
This guide covers three things a timer alone won't tell you: which foods are governed by time and which by temperature, why food keeps cooking after you turn off the heat, and how to get four dishes hot at the same moment. If you just need the countdown running, our free cooking timer opens in a browser tab with nothing to install.
What a Cooking Timer Is Actually For
A timer is the right tool when food changes predictably with time: pasta, rice, steeping tea, brewing coffee, boiling eggs. It's the wrong tool for anything where doneness means a specific internal temperature, which covers meat, poultry, fish and most baking. For those, a timer tells you when to start checking, and a thermometer tells you when to stop.
This distinction sounds obvious and almost nobody applies it. People will time a chicken breast to the minute and never once put a probe in it, which is how you end up with either a dry breast or an unsafe one, with no way of knowing which until you cut it.
The useful mental split is this. If the food is thin, submerged in liquid, or extracting into liquid, time works. If it's thick, has a middle that heats slower than its outside, or came from an animal, temperature wins.
Cooking Times for Common Foods
Times below assume sea level, a properly preheated pan or a full boil, and a normal domestic hob. Treat them as the moment to start checking rather than the moment to stop cooking.
| Food | Time | Start timing when |
|---|---|---|
| Dried pasta | 8 to 12 min | Pasta enters boiling water |
| Fresh pasta | 2 to 4 min | Pasta enters boiling water |
| White rice | 18 min simmer, 10 min rest | Lid goes on |
| Brown rice | 30 to 45 min, 10 min rest | Lid goes on |
| Green tea | 1 to 3 min | Water hits the leaves |
| Black tea | 3 to 5 min | Water hits the leaves |
| Herbal tea | 5 to 7 min | Water hits the leaves |
| French press coffee | 4 min | First pour |
Pasta
Most dried pasta lands between 8 and 12 minutes, but shape matters more than the box suggests. Spaghetti runs 9 to 10 minutes, penne 11 to 13, fettuccine 10 to 12 and macaroni 8 to 10. Fresh pasta needs only 2 to 4.
Two habits fix most pasta problems. Start the timer the moment the pasta goes in, not when the water returns to a boil, and taste a strand about two minutes before the stated time. Al dente is a texture you check for, not a number you wait out.
Rice
White rice needs roughly 18 minutes of covered simmering, then 10 minutes off the heat with the lid still on so it can steam. That rest isn't optional. It's where the grains finish and firm up, and skipping it is the single most common cause of gummy rice.
Brown rice takes far longer, around 30 to 45 minutes depending on the variety, followed by the same 10 minute rest. The bran layer slows water absorption, which is the whole difference.
Eggs
For a large egg from the fridge into boiling water, 6 minutes gives a runny yolk, 8 gives jammy and 11 to 12 gives hard boiled. Egg size, altitude and starting temperature all shift those numbers, and the ice bath afterwards matters as much as the timing. Our full guide covers how long to boil an egg and why the same chart behaves differently in different kitchens.
Tea
Steeping is where timers earn their keep, because the window between good and bitter is narrow. White and green tea want 1 to 3 minutes in cooler water around 160 to 185°F, black tea 3 to 5 minutes near boiling, and herbal tisanes 5 to 7 minutes at a full boil.
If your tea comes out harsh, resist the urge to shorten the steep first. Over-steeping pulls out tannins, but so does water that's too hot, and lowering the temperature usually fixes bitterness better than cutting the time.
Coffee
Four minutes is the French press standard. Start the timer at the first pour, break the crust at four minutes, then press slowly. The National Coffee Association's immersion guidance puts the same four minutes alongside water at 199 to 200°F.
The step people skip: pour it all out immediately. Coffee left sitting on the grounds keeps extracting and turns bitter within minutes, which no timer can save you from.
When a Timer Isn't Enough
For meat, poultry and fish, minutes are an estimate and internal temperature is the answer. The USDA's safe minimums are 165°F for all poultry, 160°F for ground meats, and 145°F with a three minute rest for whole cuts of beef, pork, veal and lamb. Fish is 145°F, or cooked until it flakes and turns opaque.
Two things surprise people about that list.
The first is why ground beef needs a higher temperature than a steak. Bacteria live on the surface of whole muscle, where a sear destroys them, but grinding mixes that surface all through the meat, so the interior has to reach the higher number.
The second is pork. The USDA cleared whole cuts of pork at 145°F back in 2011, and a little pink in the centre at that temperature is entirely normal. A generation of dry pork chops came from cooking to an obsolete standard.
What you cannot do is judge by eye. Colour and "the juices run clear" are not reliable indicators: burgers turn brown before they reach 160°F, and safely cooked pork stays pink. An instant-read thermometer costs about the same as a takeaway and removes the guesswork permanently.
Why Food Keeps Cooking After You Turn the Heat Off
Because the outside is still hotter than the inside. Heat keeps travelling inward after you remove food from the heat, and the centre carries on rising for several minutes. This is called carryover cooking, and ignoring it is the most common way to overshoot a target you hit perfectly.
How much rise depends on the size of the cut. A steak, chicken piece or burger typically climbs 3 to 4°F while resting, while a large roast or turkey can rise 10 to 15°F. The practical response is to pull food off the heat below your target and let the rest finish the job.
The cooking method matters too. High-heat approaches like grilling and broiling create a steep temperature gradient and therefore more carryover, while low and slow methods produce much less. A smoked brisket barely climbs. A seared steak does.
This is also why the USDA's three minute rest is written into the safe minimum rather than tacked on as a serving suggestion. During the rest the temperature holds or keeps rising, finishing the work of reducing bacteria.
Carryover isn't limited to meat. It's why boiled eggs go straight into ice water, why rice rests covered off the heat, and why vegetables you meant to keep crisp turn soft in the colander.
Why the Same Recipe Takes a Different Time in Your Kitchen
A recipe time is one measurement taken in one kitchen. At least six things change it in yours.
Pan size and material. A thin pan loses heat the instant food hits it. A heavy cast iron pan holds temperature and cooks faster once hot. A wide pan evaporates liquid quicker than a deep one, which shortens braises and dries out rice.
How full the pot is. Six cold eggs pull more heat from the water than one. A crowded roasting tin steams rather than roasts. Doubling a recipe rarely means doubling the time, but it almost always means adding some.
Starting temperature. Meat straight from the fridge takes noticeably longer than meat that's sat out for twenty minutes, and the difference is largest in thick cuts.
Altitude. Water boils cooler as you climb, so anything boiled or simmered slows down. Above roughly 3,000 feet this stops being a rounding error.
The lid. On or off changes everything, and recipes are inconsistent about saying which.
Your hob's idea of medium. Gas, induction and electric coils behave differently at the same dial setting, and induction in particular runs hotter than most recipe writers assume.
None of this makes printed times useless. It makes them a starting point that you calibrate once and then trust for your own kitchen.
How Do You Run Several Timers at Once?
Work backwards from when you want to eat. Write down the finishing time first, then subtract each dish's cook time and its rest time to get its start time. Label every timer with the dish name, because three unlabelled countdowns are worse than none.
This is how professional kitchens do it. Chefs plan multi-component meals backwards from service time rather than forwards from when they start cooking, and the same approach turns a domestic roast dinner from a juggling act into a list. America's Test Kitchen builds its entire holiday guidance around planning in advance for the same reason.
Three things make it work in practice:
Rest time is your flex. A rested roast tolerates an extra ten minutes under foil. Pasta does not tolerate an extra ninety seconds. When the schedule slips, absorb it in the resting, never in the boiling.
Count the invisible steps. Oven preheat, bringing a big pot to the boil, and taking meat out of the fridge all take real minutes and none of them appear in the recipe's stated time.
Use fixed clock times, not durations, for the big anchors. A countdown answers "how long left." For "the bird goes in at 2:40," an online alarm clock is the better tool. For a braise with no reliable end time, a stopwatch counting up tells you how long it's been in, which is what you actually want to know. And a full-screen clock on a tablet propped in the corner beats squinting at the oven display from across the kitchen.
Choosing a Kitchen Timer
There's no single best answer, and anyone who tells you otherwise is selling something.
Your phone wins when the alert has to reach you somewhere else in the house. Lock-screen notifications cut through, and modern voice assistants handle several named timers at once. The cost is that you've brought your phone into the kitchen, with everything else it does.
Voice assistants win for wet or floury hands, which is a bigger deal than it sounds when you're mid-recipe.
Browser timers win when you're already at a screen and want several labelled countdowns visible simultaneously. That's the multi-dish case, and it's the one phones handle worst because you can only see one screen at a time. We compared the free online timers if you want to see how the options differ.
Mechanical dial timers still beat every one of them for the thing that matters most in a kitchen: no battery, no signal, no tab that can be closed by accident, and it works during a power cut.
One caveat for any browser timer, ours included. The tab has to stay open for the alert to fire, and browsers deliberately slow down timers in hidden tabs. Keep the tab visible, or use your phone when the alert genuinely can't be missed.
Conclusion
Three things to take away. Use a timer for anything submerged or steeping and a thermometer for anything with a middle, because those are different problems. Expect food to keep cooking after it leaves the heat, and pull it early enough that carryover lands it where you wanted. And when several dishes share a deadline, the timing is a scheduling problem, so solve it backwards from dinner rather than forwards from now.
Our countdown timer is free, needs no account and runs in any browser. Bookmark Clock-Zone's time tools and you'll have a timer, alarm, stopwatch and clock in one tab next time the kitchen gets busy.
Frequently Asked Questions
What is the best timer for cooking?
It depends on where you need the alert. A phone reaches you in another room, a voice assistant works with messy hands, and a browser timer is best when you want several labelled countdowns on one screen. A mechanical dial timer is the most reliable of all, since it needs no battery, signal or open tab.
Can I run more than one cooking timer at the same time?
Yes, and for any multi-dish meal you should. Label each one with its dish, because unlabelled countdowns going off together create more confusion than they solve. Work out the start times by counting backwards from when you want to serve, including rests and oven preheats.
Why does my food take longer than the recipe says?
Recipe times are measured in one kitchen and rarely transfer exactly. Pan material, how full the pot is, whether the lid is on, your altitude, the food's starting temperature and how your hob interprets "medium" all shift the result. Treat printed times as the point to start checking.
Do I need a thermometer if I have a timer?
For meat, poultry and fish, yes. Doneness there is defined by internal temperature, not elapsed minutes, and colour is not a reliable substitute. Burgers brown before they reach a safe temperature and correctly cooked pork can still look pink. For pasta, rice, tea and coffee a timer is enough.
How long should meat rest after cooking?
The USDA requires at least three minutes for whole cuts of beef, pork, veal and lamb, and treats it as part of the safe minimum rather than an optional step. Larger roasts benefit from longer. During the rest the internal temperature keeps climbing, roughly 3 to 4°F in a steak and 10 to 15°F in a big roast, so factor that in and pull the meat early.
Related Guides
- Egg Timer: Perfect Boiled Eggs Every Time — the full breakdown of boil times, part of this cooking-timing cluster.
- Best Free Online Timers in 2026 — how our timer and others compare on accuracy, ads and readability.
- Study Timer: How to Use One and How Long — the same "protect the block" logic, applied to focused work instead of dinner.